 |
| Measuring radiator airflow is easy and cheap. |
For almost as long as I’ve had the Prius, I have blocked off
part of the grill opening—the theory being that reducing flow through radiators
reduces the drag associated with pushing air through them, what we call cooling
drag.
On my truck, my first throttle-stop tests showed that
covering the grill openings completely reduced drag around 4%. Obviously, we
can’t drive around like that all the time; most manufacturers today use
shutters in front of radiators that can open or close to allow airflow when
needed and reduce drag when not.
 |
| Most of them use internal shutters, but a few (such as Ford and Hyundai) have started using visible, external shutters. This is the front end of the Ford Mach-E; the slats rotate to an open position when cooling air is needed. |
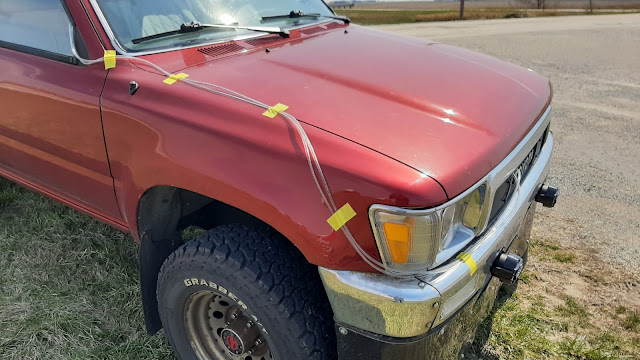
I didn’t want to get that involved in
designing an active system so I blocked part of the truck’s grill with plastic
covers, leaving the center part of the upper grill open.
But what does blocking the grill openings like this do to
the amount of airflow across the radiators? I know it can reduce drag, but does
it adversely impact cooling system performance? And if so, how much?
Under Pressure
The flow of air through a radiator depends on the
pressure on its front side and pressure on its rear; the difference between
these is what we call a “differential pressure” (or “gauge pressure”), and it can be measured quite easily
with some tubing and a manometer. Greater differential pressure (with respect
to the back side) means more flow; smaller differential pressure means less
flow. And negative differential pressure? Well, that means air is
flowing across the radiator in the opposite direction it’s supposed to!
ETA 3/25/2026: The above paragraph and the rest of the post that follows are not correct. For in-depth analysis and instructions on what to measure on your car, see:
To measure the differential pressure, I ran tubing to the
front and back sides of the radiator (truck) or radiators (Prius). Like mine,
your car probably has a cooling fan behind the radiator; if there’s enough room, you can snake the tube around it like I did on the truck but if not, placing
the tube end somewhere near the radiator outlet is good enough. This side of
the radiator will serve as the reference for comparison of the front pressure.
Tape the second tube to the front of the radiator:
Then drive the car and record the pressures; I used a test speed of 80 km/hr. A digital
manometer that will calculate average pressure over a recorded interval is helpful
for this testing, since you might find that the turbulence in the engine bay
makes the pressure readings jump around a lot (especially on older vehicles—the
truck was much worse in this respect than the Prius). I did runs in opposite
directions and then averaged the results.
The Prius has an interesting arrangement of heat exchangers,
with the inverter coolant radiator sitting above the AC condenser (behind the upper "mustache" grill openings), and behind them the larger engine heat exchanger. I measured pressures on both
the upper (inverter) and lower (AC) exchangers. The truck has a conventional
single radiator—AC was an option but this DLX trim doesn’t have it.
Results
|
|
Open
|
1
|
2
|
3
|
1+3
|
1+2
|
2+3
|
|
Upper (inverter)
|
+110 Pa
|
+70 Pa
|
+60 Pa
|
+40 Pa
|
+20 Pa
|
-
|
+10 Pa
|
|
Lower (AC condenser)
|
+80 Pa
|
+50 Pa
|
+30 Pa
|
-
|
-
|
+20 Pa
|
0 Pa
|
Surprise! Blocking any part of the grill opening
reduces flow through both upper and lower radiators by at least 35%. That is
significantly more than I expected. The grill block I’ve been using on this car
is equivalent to number 2; in that configuration, flow through the inverter
radiator is cut in half while flow through the AC condenser is reduced by more
than 60%. That probably means the grill block was reducing drag, but in the
interest of inverter and engine longevity (Priuses of this generation have a
reputation for eating inverters and head gaskets), I’ve gone ahead and removed
the grill block permanently. You’ll have to decide what balance of drag
reduction and cooling capacity you’re comfortable with on your own car.
Now, how about the truck? I tested on the same road and in
similar conditions as when I did the Prius tests. I expected the results to be
similar. Were they?
|
|
Open
|
1
|
1+2
|
|
Center (engine)
|
+40 Pa
|
+40 Pa
|
0 Pa
|
In a word: no. Unlike the Prius, the truck has no ducting or
baffling around the front side of the radiator, no engine undertray, a lot more
space in the engine bay, and large gaps between the grill, bumper, lights, and lower
valance. I mentioned that the instantaneous pressure readings jumped around a
lot more too; I thought there was something wrong with the manometer at first
so I moved the reference around but got exactly the same results:
It turns out that flow through the truck’s radiator is just
that much worse than on a more modern, optimized system like the Prius. And the
two small upper grill blocks were blocking flow across the radiator almost
completely! I’ve removed them but left the lower block in place. Next I’ll try
sealing gaps on the front end and putting baffles around the radiator to see
how much I can improve flow across it.
Radiator flow testing is simple, cheap, quick, and
enlightening. Try it on your car!


Could You please elaborate what the: - means in the prius results? I can see a 0 Pa in rhe last column, so I don't get the -
ReplyDeleteOh sure! In the interest of time, I didn't test every combination of grill blocking for each measurement location. "-" just means I didn't test that block arrangement so there's no data for it.
DeleteThank You very much. I got the impression from Your data that blocking totally up or down causes a big loss of pressure there, so i made two openings in the upper grille block on my Fiat.
ReplyDeleteYou're welcome! Just make to sure to measure pressures on your Fiat; blocking parts of the grill might make more or less difference than it did on my car, and you can only find that out through testing.
DeleteWill do. I am already considering gauge options for measuring, because I am doing other mods like: underside panels and trying to replicate the air curtains of the Mercedes W246 B-class.. (I know that is a steep hill to climb 🙂)
ReplyDeleteReading through your blog here, I missed exactly what digital manometer you are using for your testing. Could you please elaborate on brand/model/supplier/cost instrumentation you are using?Or recommendations on such similar tools? Thanks!
ReplyDeleteHi Mark, I've been using a Perfect Prime that's a couple years old but similar to this one: https://www.amazon.com/gp/product/B00N3PPZZY/ref=ppx_yo_dt_b_asin_title_o05_s01?ie=UTF8&psc=1. It's fairly low-cost; if you prefer a mechanical gauge, Magnehelic is not much more (maybe $20-30). You can find the PP manometers and other brands sold with pitot tubes as well.
DeleteI should mention too--when deciding on a gauge, look for one that with a range of at least +/- 250 Pa or 1 inH2O, which is about the largest range of pressures you'll find at 80 kph or below.
DeleteThanks! BTW, I did discover, minutes after my first post here, that I found another section of your blog site which showed more about the Magnahelic and your PP device. I think I'm going to go for the PP or similar, as I'm a bit more of a digital guy than analog. My poor memory needs electronics to remember readings while I'm driving, as my wife is not much into helping me out with testing. Hmm.. It just occurred to me, I wonder if my small drone could keep up with my driving to take video for tuft testing... Probably not, I don't think its designed to go that fast (40mph+) while tracking me. More experiments are in order :) Current goals I'm working on are to increase mpg and wind stability of my 2007 Prius, and better engine cooling and mpg of my 2008 Jeep Grand Cherokee CRD. I liked reading about your engine compartment airflow testing, which gave me some ideas for the Jeep, perhaps using hood vents like from my old 1998 Jeep Grand Cherokee 5.9L (Niner).
ReplyDelete