In my first round of measuring pressures across radiators, I found that small amounts of grill blocking can significantly reduce
cooling airflow through heat exchangers, and that the optimization of engine
bay flow in more modern cars can have a major effect on the flow through
radiators. My older truck had less than half the pressure differential across
its radiator than my Prius had through two stacked radiators (one in front of
the other), and the instantaneous pressure readings in the truck jumped around
a lot while in the Prius they were stable.
ETA 3/25/2026: Since writing this, I've completed an aerospace engineering degree and, as one of my first projects after graduating, I've gone back to revisit cooling system performance. A lot of what I wrote below is just flat-out wrong. For in-depth analysis and instructions on what to measure on your car, see:
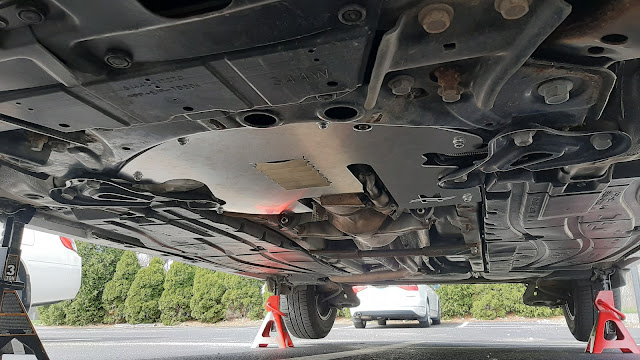
Recently, I went out again to test radiator pressures on
the Prius after making a modification to the airflow under the car. In stock
form, the large central exhaust tunnel is open:
|
One change from stock here is the addition of a catalytic converter shield, visible just at the back of the engine undertray.
|
Generally, cars benefit from having smooth floors, which
tend to reduce both lift and drag. With the EV transition under way, more and
more cars now have completely covered undersides. Here’s my sister-in-law’s Tesla
Model 3:
And here’s a Rivian R1S, which has a similarly smooth
underside:
Unfortunately, it’s very hard to test underside smoothing
on the road; in order to fit panels, even temporarily, you have to jack up the
car and install them—an involved process that can take a long time. Testing conditions
can change rapidly, and if it takes too long to set up a modification, you run
the risk of getting skewed results (I abandoned a test on my truck just this
morning because of this. The modification I was testing took much longer to put
in place than I had anticipated, during which time the temperature rose several
degrees and a wind picked up).
So, underside panels are a modification that you will
probably have to build and then use a standalone measurement (like suspension
ride height or pressure measurement on the panel itself) rather than a
back-to-back comparison to see if it’s working. With that in mind, I designed
and fabricated a 6mm aluminum closeout panel to cover the central tunnel on the
Prius.
 |
I had never cut aluminum before, but it turns out to be really easy with the correct jigsaw blade and some WD-40 for lubrication.
|
To space it from the exhaust pipe and ensure they don’t
touch, the closeout panel ended up with a nice curve in it but also a gap along
each side. Gaskets are available online in a variety of sizes and shapes; I
found one that looked like it would work and installed it along each side:
Along with the panel, I finally replaced the exhaust heat
shield that had fallen off two years ago. It sits above the exhaust pipe in
this area, and without it I noticed that on a long freeway drive the floor was
getting a little warm in the backseat footwell. These shields corrode easily
around their mounting bolts; you can usually fix them by inserting a larger
fender washer between the bolt and shield.
That smooths out the front ~2/3 of the Prius’ underside. I’ll
panel over the rear axle gap later this summer, but for now I want to see if
this cover has affected flow out of the engine bay.
Radiator Pressures
I’ll measure pressure on the underside of the panel itself sometime
in the next few weeks. For now, I measured the differential pressure across
the cooling package with the closeout panel in place to see if there was any
difference from my previous measurements without it. And since I was measuring
radiator pressures anyway, I decided to investigate grill blocking again—this time,
blocking up each side of the grill while leaving the middle open.
 |
| Configuration 1. |
 |
| Configuration 2. |
 |
| 1 + 2. |
|
|
Open
|
1
|
2
|
1+2
|
|
Upper
(inverter)
|
+90 Pa
|
+70 Pa
|
+50 Pa
|
+30 Pa
|
|
Lower
(AC condenser)
|
+80 Pa
|
+50 Pa
|
+20 Pa
|
0 Pa
|
So, mostly unchanged; the flow through the upper (inverter)
radiator is a little lower than last time, but across the lower (AC)
exchanger is the same. It looks like the closeout panel is having a slight
effect on engine bay airflow. And the grill blocking, just as last time, has
more of an effect than I expected; even with the center portion of the grills
open, airflow through the radiators is restricted pretty substantially. And unexpectedly, blocking the lower grill opening restricts airflow through the upper radiator more than blocking the openings right in front of it—different behavior than with full-width grill blocks!
Getting More Flow
I’ve already made one modification to try and get more flow
through the cooling package. A couple of years ago, I measured the pressure
difference between the front (engine bay) and back side (facing the wheel) of
the fender liner and installed a vent there:
Taping over these vents reduces pressure across the lower
radiator just a little, -10 Pa or so. I probably won’t ever need more cooling
capacity than the car has now, but on the off chance I do (say, if I want to
drive across Death Valley in July*), I wouldn’t mind knowing the most effective
placement for additional vents. With that in mind, I identified three locations
on the hood that would be easy to cut out and measured the pressure difference
across the panel, just like I had done in the wheel housings:
The two locations further up the hood (you can see all measurement
locations marked by tape—it’s easy to do this before you go out and test) showed
a difference of -60 Pa (lower pressure on top than under), and the front
location -50 Pa. That means vents in these locations will exhaust air from
under the hood. I’ll decide in the next few weeks whether I want to fit vents
or leave it as is.
Try this on your own car!
(*As it turns out, I’m planning a road trip this summer
that might take me…across Death Valley in July).


Comments
Post a Comment