Measuring Pressure Changes With a Spoiler: Part 1
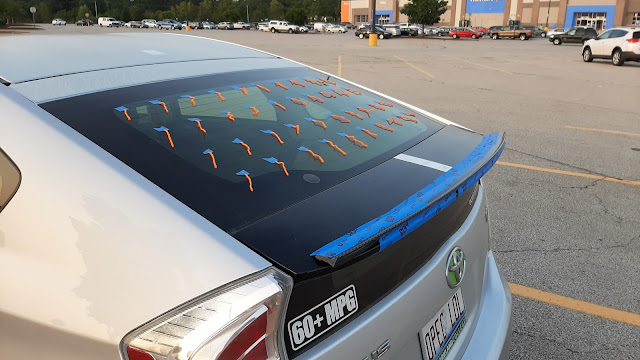 |
| The spoiler temporarily taped in place. Interior/exterior painter's tape like this is perhaps the most useful tool in the home modifier's toolbox. |
Like you, I’ve noticed that tons of cars now have tiny spoilers. You can usually find them on the back of sedans, whether integrated like this, on the Hyundai Sonata:

Or as an add-on part, attached with permanent tape to the trunk lid as on the Toyota Corolla:

These must do something, I thought, otherwise they wouldn’t be popping up everywhere. But they’re so small; surely they can’t make that much difference?
Boy, was I wrong.
Materials
To find out, I ordered a 21mm tall lip spoiler strip from a well-known online retailer, as well as a manometer (pressure-measuring device) from the same place and a bunch of pressure-sensing disks from Scanivalve that are designed to be easily taped to a panel without disrupting airflow. As the air moves past the opening in the disk, the pressure there can be compared with static or atmospheric pressure from a pitot tube mounted high at the front of the car. The difference between the two is the gauge pressure, which is displayed on the manometer.
 |
| A number of different brands are available online, or if you prefer analog you can't go wrong with a Dwyer Magnehelic gauge. |
The gauge pressure will tell you whether the pressure acting on a particular section of the car is greater or less than atmospheric pressure. You may recall from the Bernoulli equation that this also tells us whether the air there is moving faster (lower pressure) or slower (higher pressure) than the car’s overall speed (i.e. relative to the moving car). On a back window that slopes down, higher pressure is better than lower, as this will decrease drag and lift by “pushing” (or “pulling less”) on the rear part of the car.
Pressure Measurement
I first compared pressures on the centerline of the back window and roof with and without the small lip spoiler at the back edge of the (flat) factory spoiler. (Actually, I measured pressures with the spoiler at the top of the window as well, but I’ll write about that another time). At 50 mph, the changes on the window itself were small, but on the roof—more than a meter ahead of the spoiler!—the pressure increased significantly:
 |
| Test locations on the centerline. |
 |
| Change in pressure with the lip spoiler. |
I wasn’t sure I was getting the whole picture, so I went back and tested again. This time, I measured in ten locations, 5 off-center and 5 closer to the outside edge of the window and roof. Here, the changes were more significant:
 |
| Test locations, off-center in two lines. |
 |
| Change in pressure with the spoiler. |
Sources of Error
The resolution of the manometer I bought is not nearly sensitive enough to make exact claims such as, “This spoiler increased pressure at the bottom of the window by 21.3 Pa.” Nor should we make such exact claims about the data, as you’ll commonly find people bloviating about online. We don’t need data like that when modifying our cars at home; the usefulness of this testing is its ability to identify trends such as, “Fitting a spoiler generally increases pressure on the bodywork ahead of it.” We’re testing in the real world, in a turbulent atmosphere with gusting winds and changing temperatures and humidity and roads that go up and down. I attempted to minimize distortions from those factors as much as I could by testing in different directions and averaging results, but it will still skew the data. For example, during the first test there was an unavoidable quartering wind (the roads I’m testing on all run N-S or E-W on a grid); but, that’s exactly why I decided to go out and test again on a different day with a more direct headwind. Do what you can to minimize error, but realize that you will probably have to test the same thing multiple times on different days with different weather to really get a solid idea of what a particular change does.
Results
This test really was eye-opening. I was reasonably certain I would see some increase in pressure on the rear window, but the fact that pressures increased all the way up on the roof was something I did not expect at all. The magnitude of the change in pressure also surprised me.
What can we learn from this? Well, first it’s a good illustration of the fact that shape changes to a car can affect not only the flow behind them but also ahead—something I hadn’t really grasped before trying this. In this case, the spoiler was changing the speed of the air over the roof, pretty far in front of it. Second, you can try and predict what a change will do—as I predicted that the spoiler would increase pressure, but only slightly—and you will most likely be wildly off or flat out wrong. The only way to know is to test, an idea about which I’ll write more in a future post. In the meantime, get out there and try it yourself!
 |
| Since I tested it and know that it does something beneficial, I installed the spoiler strip permanently. No guessing required! |


Comments
Post a Comment