ETA 7/10/2026: For a better explanation than this (which I wrote before enrolling in an aerospace engineering degree program), and better example of test methodology and data analysis, see my most recent post on spoiler testing.
Over the past several months, I’ve tested eight different
spoilers on my car. I could test more, but I’ve reached a point where I would
rather install something permanently and move on to other things, leaving this
spoiler project behind. Hence this Spoiler Roundup. Let's meet the competitors:
I’ve left out the spoiler + fins tests
since they weren’t much different from the spoilers alone.
An important step in analyzing experimental results like
this is the “gut check”: do the data look reasonable? For instance, if I
graphed the pressure changes like this and found that the huge Hellcat spoiler
made a smaller difference than the short Gurney flaps, that would stick out as
something unexpected and require further testing. Everything looks good here;
bigger spoilers or steeper angles generally increase pressure on the window and
decrease pressure on the base more than smaller spoilers, as expected. Check.
Next I’ll estimate the changes in drag and lift using the
method I outlined in my last post:
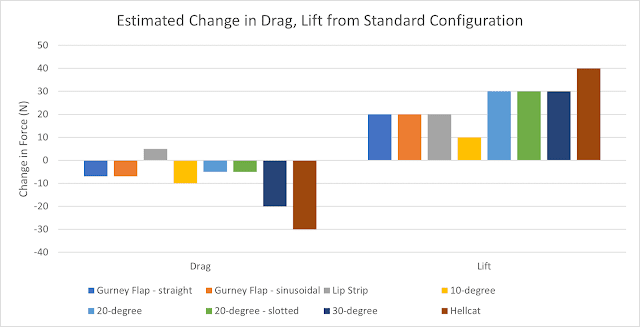 |
| Positive change on each axis shows reduction in drag or lift. |
Are these reasonable? Well, they seem to be, just comparing them to the pressure changes. I haven’t had a
chance yet to install the ride height sensor I purchased a couple months ago,
and unfortunately I don’t have an easy way of measuring drag changes on this
car. But I did perform some coastdown testing recently and verified that
the expected change in drag from adding the Hellcat spoiler (+15% or so) correlates
with the change in magnitude of acceleration (+13-14%) I measured in that test.
That suggests that this method of estimating drag and lift changes is good
enough for comparison since the calculation was fairly close to reality for one of these spoilers. Bigger spoilers or steeper angles generally decrease lift and
increase drag more than the smaller ones, as expected. Check.
Decision Time
Now the question is: out of the spoilers I’ve tested, is
there an optimum? That is, does one of the spoilers fit my goals and
design parameters better than the others?
Yes—and it turns out, it’s the spoiler I’ve had installed on
my car the last two years.
The Hellcat and steeper board reduce lift a lot but also
increase drag a lot—so those are out. The small Gurney flaps and shallower
board don’t increase drag as much but also have a smaller effect on lift. And the middle boards moderately decrease lift with a small increase in drag. But
the lip strip—which is similar in height to the Gurney flaps but has a nice
curve rather than just sticking straight up abruptly—decreases lift as much as
the flaps and may also decrease drag slightly. It does that without extending
the spoiler at all and with minimal increase in height, so my tent will still
fit just fine. And it’s a ridiculously easy installation since the strip is
just taped onto the existing spoiler. We have a winner!
Pay attention to the process I used to get here. This
is how you should design and test to optimize changes to your car. Don’t build
something and hope it works, or assume that measurements from another car
transfer to yours, or guess at what you think the air will do over your car. Test a lot of designs, analyze
the results, compare them to your goals, and then make a permanent modification
(or no modification if nothing you tested did what you wanted). This is the process that OEMs use, and it results in interesting designs
such as this example:
Those are small dams inside the slots of the Ioniq 5’s rear
spoiler. How do you think Hyundai engineers figured out that those do something
beneficial (whatever that may be)? Do you think they guessed and went right to production? Or did they
test a bunch of designs, analyze the results, compare them to their design
goals, and select the one that worked best?
Installation
This time around, I carefully removed the cheap double-sided
tape that came on the spoiler and added stronger Gorilla VHB tape. Hopefully
this will stand up better and last longer than the 2 years I got out of the
first installation.
On the car and ready to go:
Go try this on your own car, with whatever modification you're interested in investigating. You will be amazed at what you
can learn through testing.


Comments
Post a Comment